전체 페이지뷰

레이블이 angularjs인 게시물을 표시합니다. 모든 게시물 표시

2016년 2월 17일 수요일

angularjs-eclipse Getting-Started

https://github.com/angelozerr/angularjs-eclipse/wiki/Getting-Started

Getting Started

angelozerr edited this page  · 47 revisions
Clone this wiki locally
 Clone in Desktop

Getting Started

This page explains how to install and configure AngularJS Eclipse. This Eclipse plugin is based on the powerful javascript inference engine tern.js which is written in javascript. To use this engine on Java context, tern.java is used. It executes tern.js with node.js. That's why you will see that, you must install node.js server or use an embed node.js.
If you don't install node.js or don't use an embed node.js, only syntax coloring and completions directives will be available in HTML editor.

Installation

AngularJS Eclipse is developed/tested with Eclipse 4.4 (Luna). It is advised to use Luna (even if AngularJS Eclipse could work with older version of Eclipse).
To install AngularJS Eclipse, please read Installation - Update Site section.
When you will use AngularJS Eclipse update site you will see that:
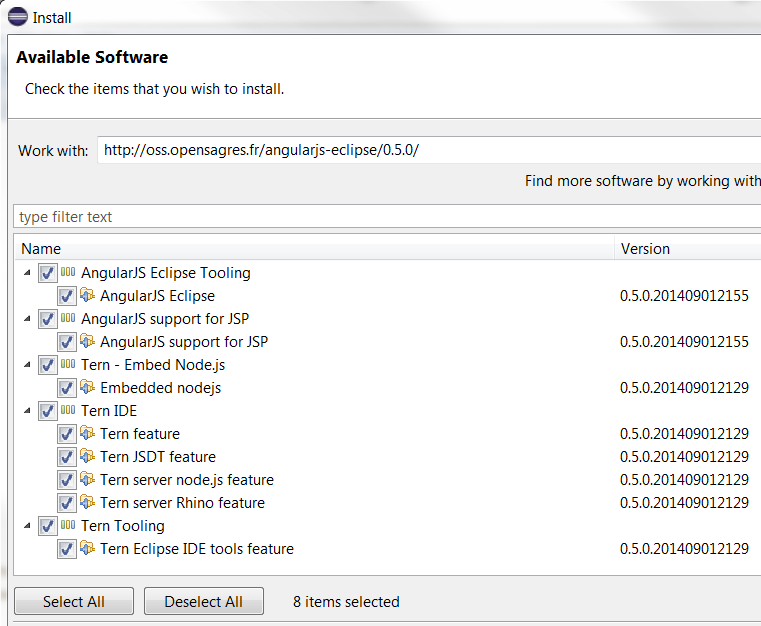
Update site
You must select:
  • AngularJS Eclipse Tooling which is AngularJS Eclipse plugins .
  • AngularJS support for JSP if you wish to use JSP with AngularJS.
  • Tern - Embed Node.js if you have not node.js installed on your computer. Node.js is required to execute tern.js.
  • Tern IDE to use tern with Eclipse IDE.
  • Tern - Tooling if you want to generate tern plugin, JSON Type Definition or Web Browser editor (CodeMirror, Ace, Orion) with tern. For more information please read Tern Toolings

AngularJS Configuration

Before using AngularJS Eclipse features (HTML features and JavaScript features) you must convert your project to AngularJS Project :
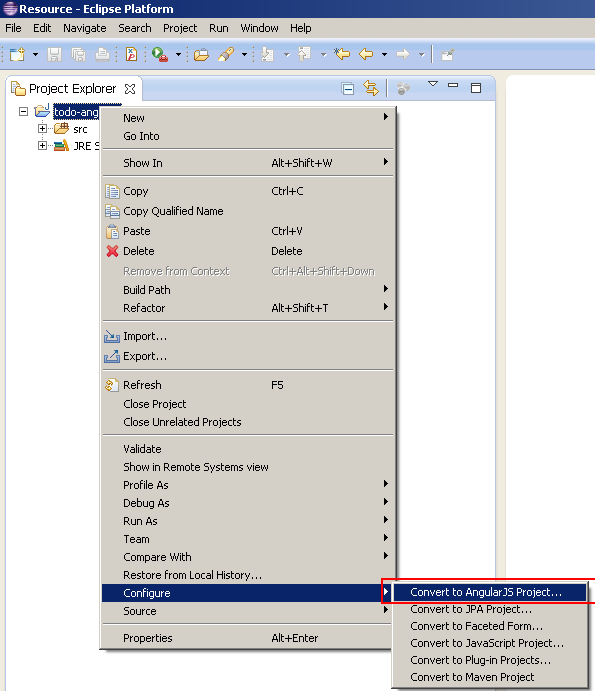
Convert To AngularJS Project

Preferences Settings

This section explains how to configure tern and angular.

Global Preferences

This section is about "global preferences" dialog that you open with Window/Preferences.

Node.js

AngularJS Eclipse is based on the javascript inference engine tern.js is written in JavaScript. To use it, tern is executed with node.js (Rhino is too slow for that). You must configure node.js. To do that you can :
  • use your installed node.js. For that, you must select the "Native node" install type and select the well node file :
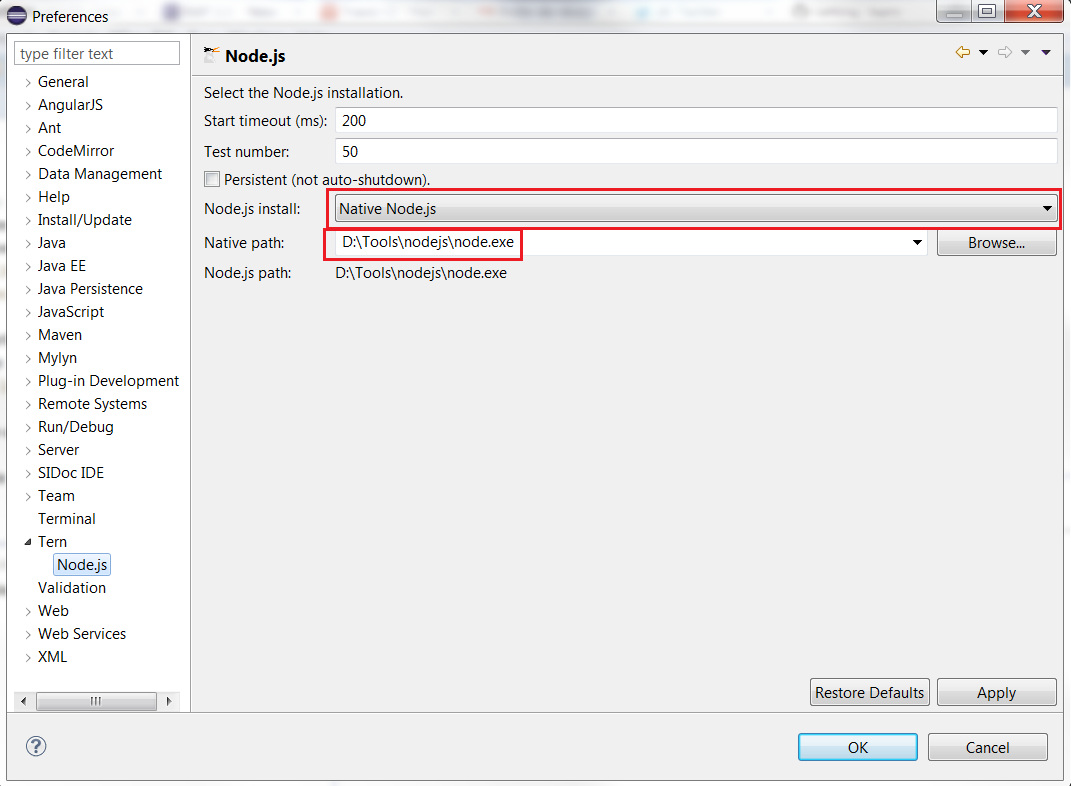
Native Node
when the native node is selected, it searches node binary in default folders installation (ex : "C:\Program Files\nodejs\node.exe" for Windows) and if it doesn't find, it searches in your node in your "PATH" environment.
If you wish to download and install node.js, it's important to restart your computer before using AngularJS Eclipse in order to your OS update correctly your "PATH" environment with your installed node.js.
  • use an embed node. For that you must install the well embed node.js according your OS :
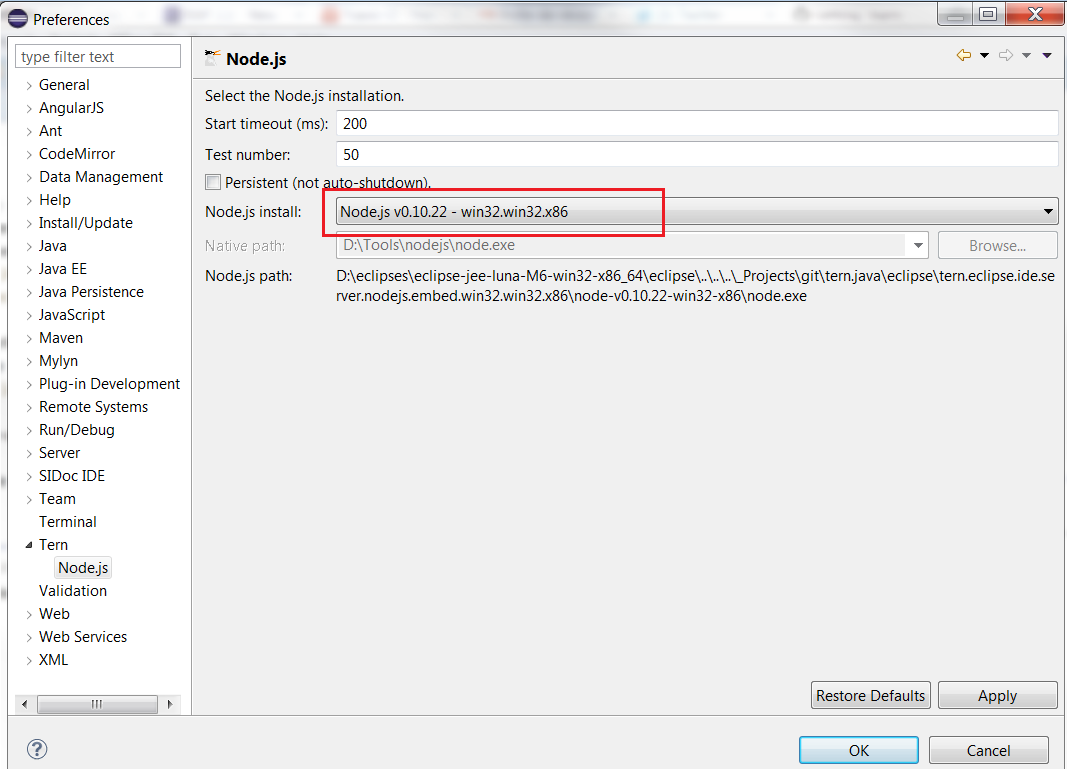
Embed Node

Project preferences

This section is about "project properties" dialog which is available if you select your project and use "Properties" menu item of the contextual menu (or Alt/Enter).

Tern Modules

Tern module is a Tern Plugin or JSON Type definition. Check that angular plugin is checked :
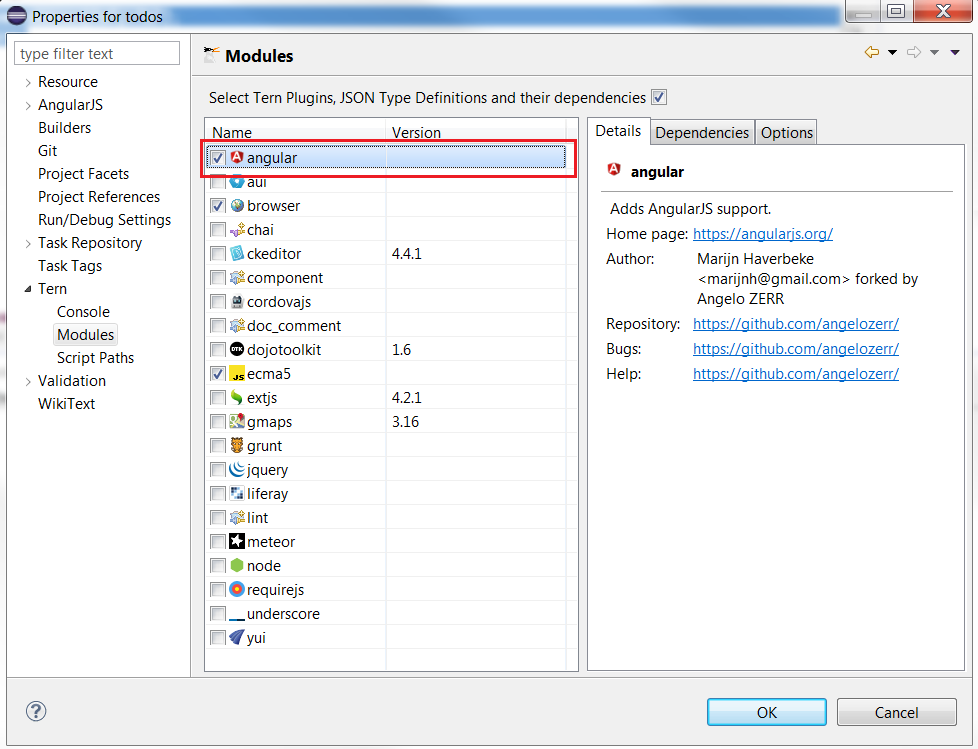
Tern Plugin.
The angular plugin gives you the capability to retrieve module, controllers,(custom) directives, etc from your javascript, manages completion hyperlink, hover, validation in HTML and JavaScript editor. It's enable to emulate the angular injection on your $scope, $http, etc.
You can select other tern module like jQuery for instance to benefit with jQuery completion inside JavaScript Editor.

Scripts path

When tern is used for completion, validation, hover, hyperlink, it must load before (just the first time) a list of your JavaScript. To do that you must configure your script paths by selecting your js folder which contains your javascripts (it's the same thing than for Java build path) :
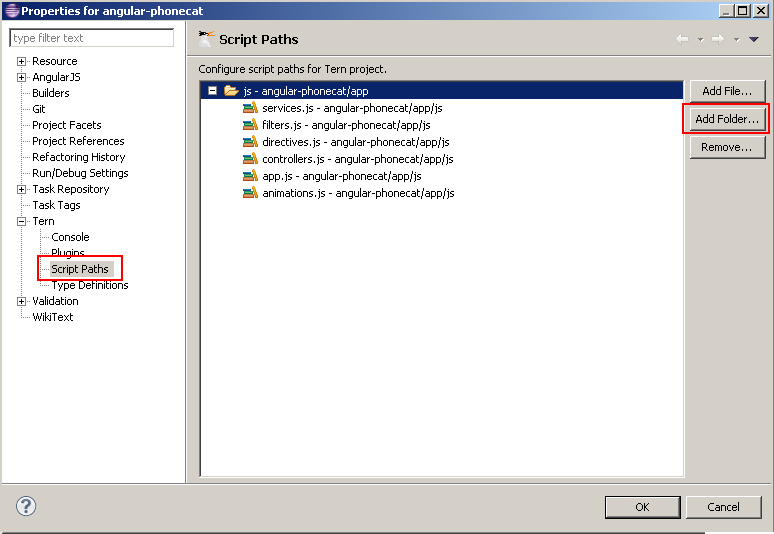
Script paths
For more information, please read Tern Script Path

Customize Directives syntax

In HTML editor, directives completion provides directive names with the ng-* syntax :
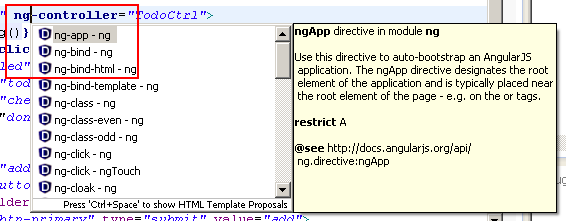
HTMLAngularConfigureDirective1
Angular supports several syntax like starting with 'x-', 'data-' and use ':', '-', '_' delimiters. You can customize the syntax that you wish for completion with the project properties. By default you will see this configuration :
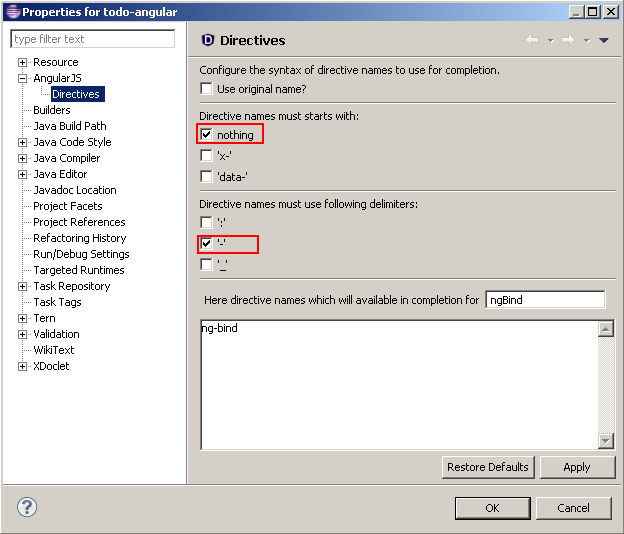
HTMLAngularConfigureDirective2
You can select other starts with and delimiters. You can see in the textarea the directive names that completion will show :
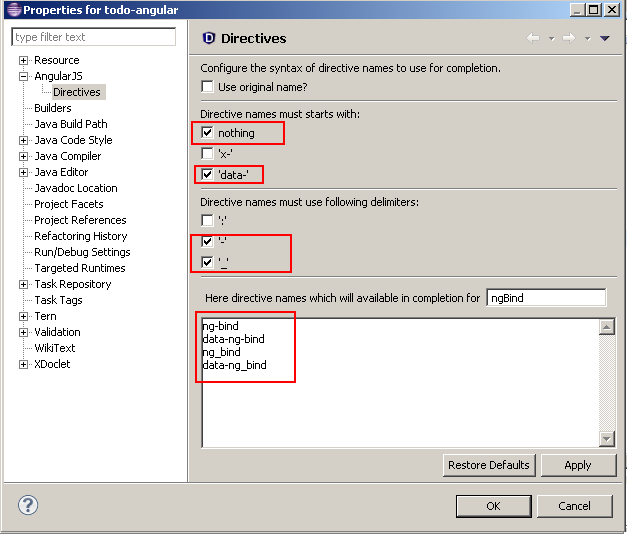
HTMLAngularConfigureDirective3
After validating your configuration, completion will show you directive names with other syntaxes :
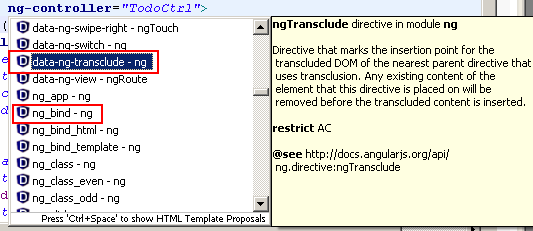
HTMLAngularConfigureDirective3

Validation

If you validate with "Validate" menu contextual menu :
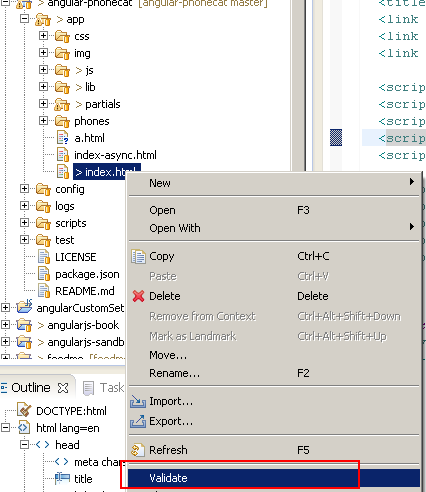
HTMLAngularValidatorValidate
you will see that AngularJS directives will have warn messages :
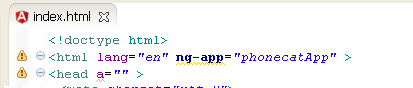
HTMLAngularValidatorWarnDirective
In this sample you have 2 warnings messages :
  • a warning with ng-app which is an Angular directive
  • a warning with "a" attribute in the head element which doesn't exist.
You could disable the warning message for unknown attribute, but AngularJS Eclipse provides the "HTML Angular Syntax Validator" which is an extension of the "HTML Syntax Validator" to support Angular directives. To use this Angular validator, you must enable it and disable "HTML Syntax Validator" :
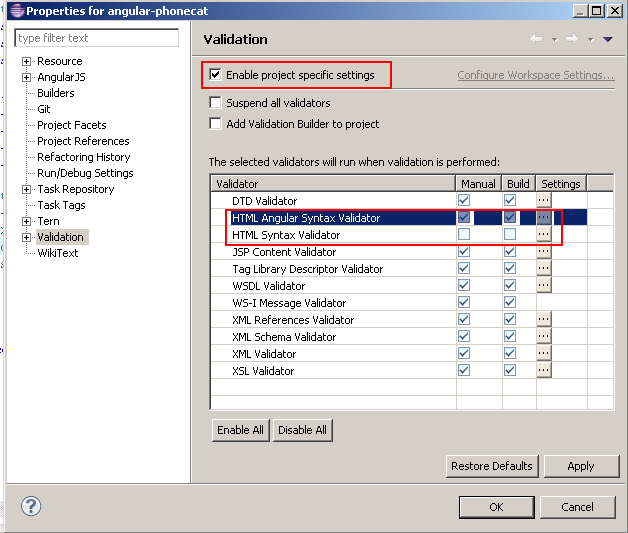
HTMLAngularValidatorUseAngular
If you revalidate you will see that directive are not marked as warning and other unknown attributes are marked as warning :
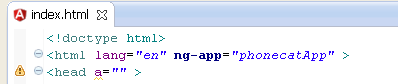
HTMLAngularValidatorWarnUnknownAttr

Validation & JSP

If you use JSP, you must disable JSP Content Validator and enable JSP Angular Content Validator.

Let's go!

At this step we have finished to configure AngularJS Eclipse, now it's time to check that everything works (tern with node.js is well configured).

HTML Editor

Open an HTML file by using standard WTP HTML, JSP editor.
Try completion on ng-app to open your module:
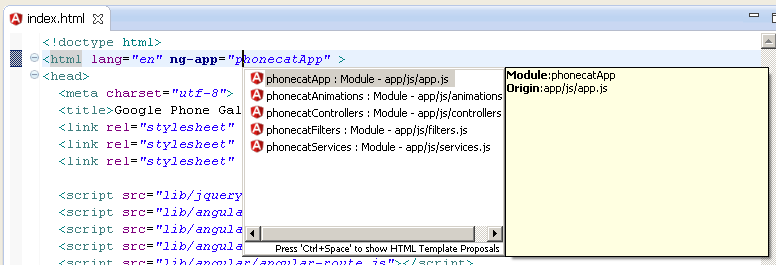
Angular Editor
This feature is managed by tern, if it doesn't work, see Troubleshooting section.

JavaScript Editor

Open a javascript editor and try to open completion for angular model:
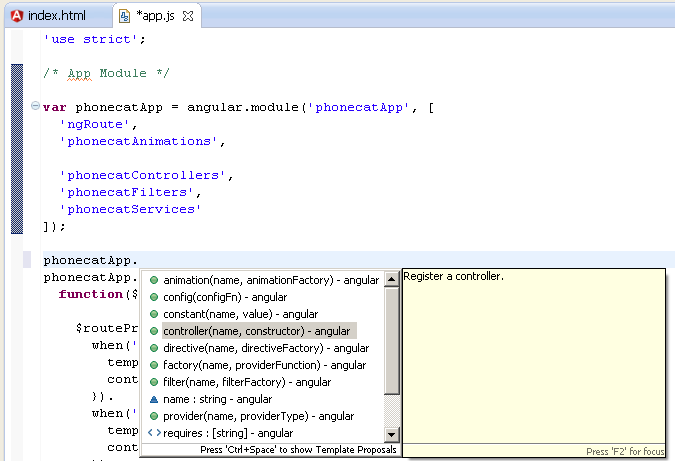
Angular Editor
This feature is managed by tern, if it doesn't work, see Troubleshooting section.

Troubleshooting

If you have checked your configuration and completion doesn't work for HTML and JavaScript editor, it means that there is a problem with tern with node.js. To verify that you can see errors with :
  • Error log view.
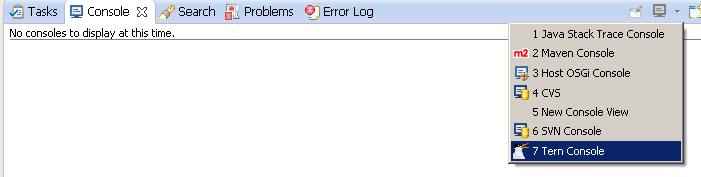
  • Tern console

Error log view

TernErrorLog

Tern console

You can trace the start of node.js server and the request/response of the tern server by using the Eclipse console.
To do that, you must active the tern console for your project:
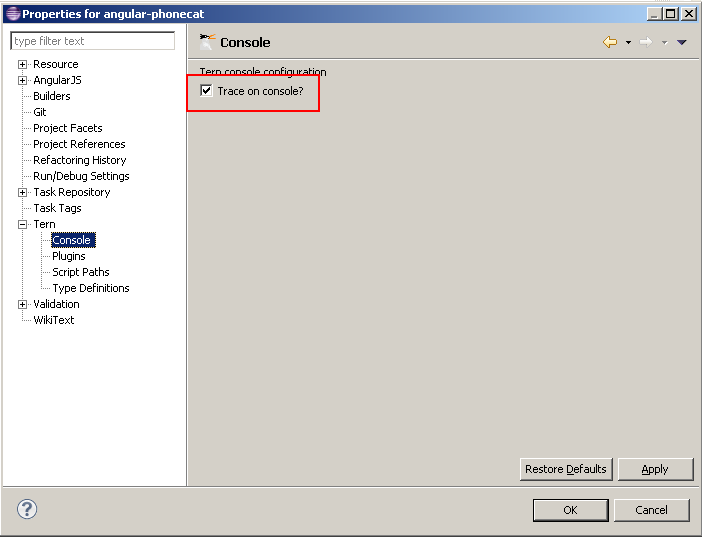
TernConsoleProjectProperties
and open the tern console:
TernConsoleOpen
If you retry to execute completion for instance to use tern server, you will see the node.js command and the error in the console:

TernConsoleError
When you will have not problem, you can see the JSON request/response of the tern server when it is use it:
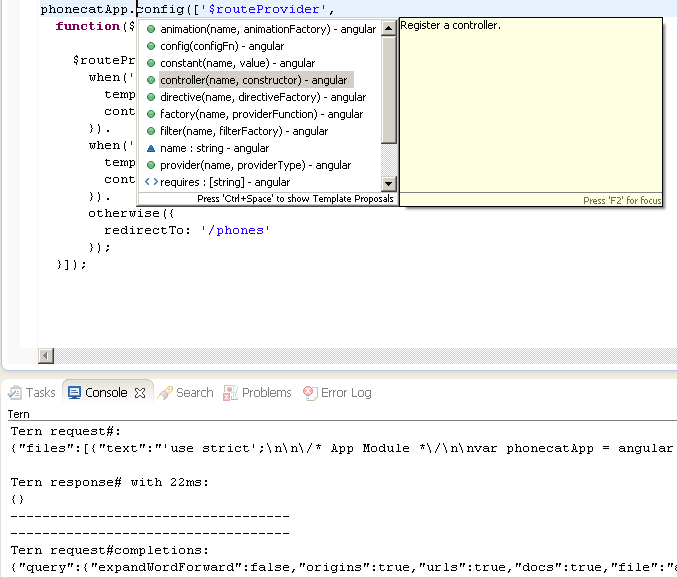
TernConsoleOK
See Tern Console for more information.
If you have again, problem, please create an issue here.

Angular Explorer

Angular Explorer View gives you the capability to display Angular elements like modules, controllers of your AngularJS application. To open it go to Window/Show View and selectAngular Explorer :
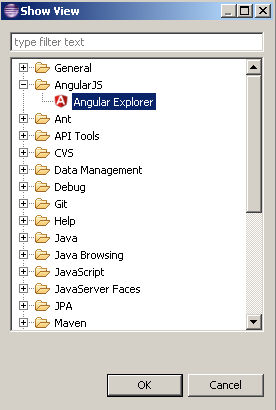
ShowViewAngularExplorer
After that you can see your modules, controllers, etc :
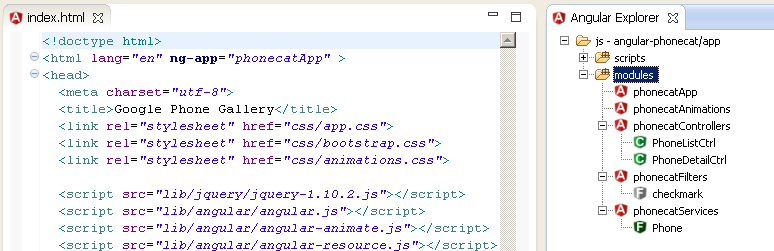
Angular Explorer
Please read Angular Explorer for more information.

Open Angular Element

You can search and open angular elements like module, controller, directives, etc with the Open Angular Element dialog that you can open with Ctrl+Shift+Z when you are editing a JavaScript or HTML file :
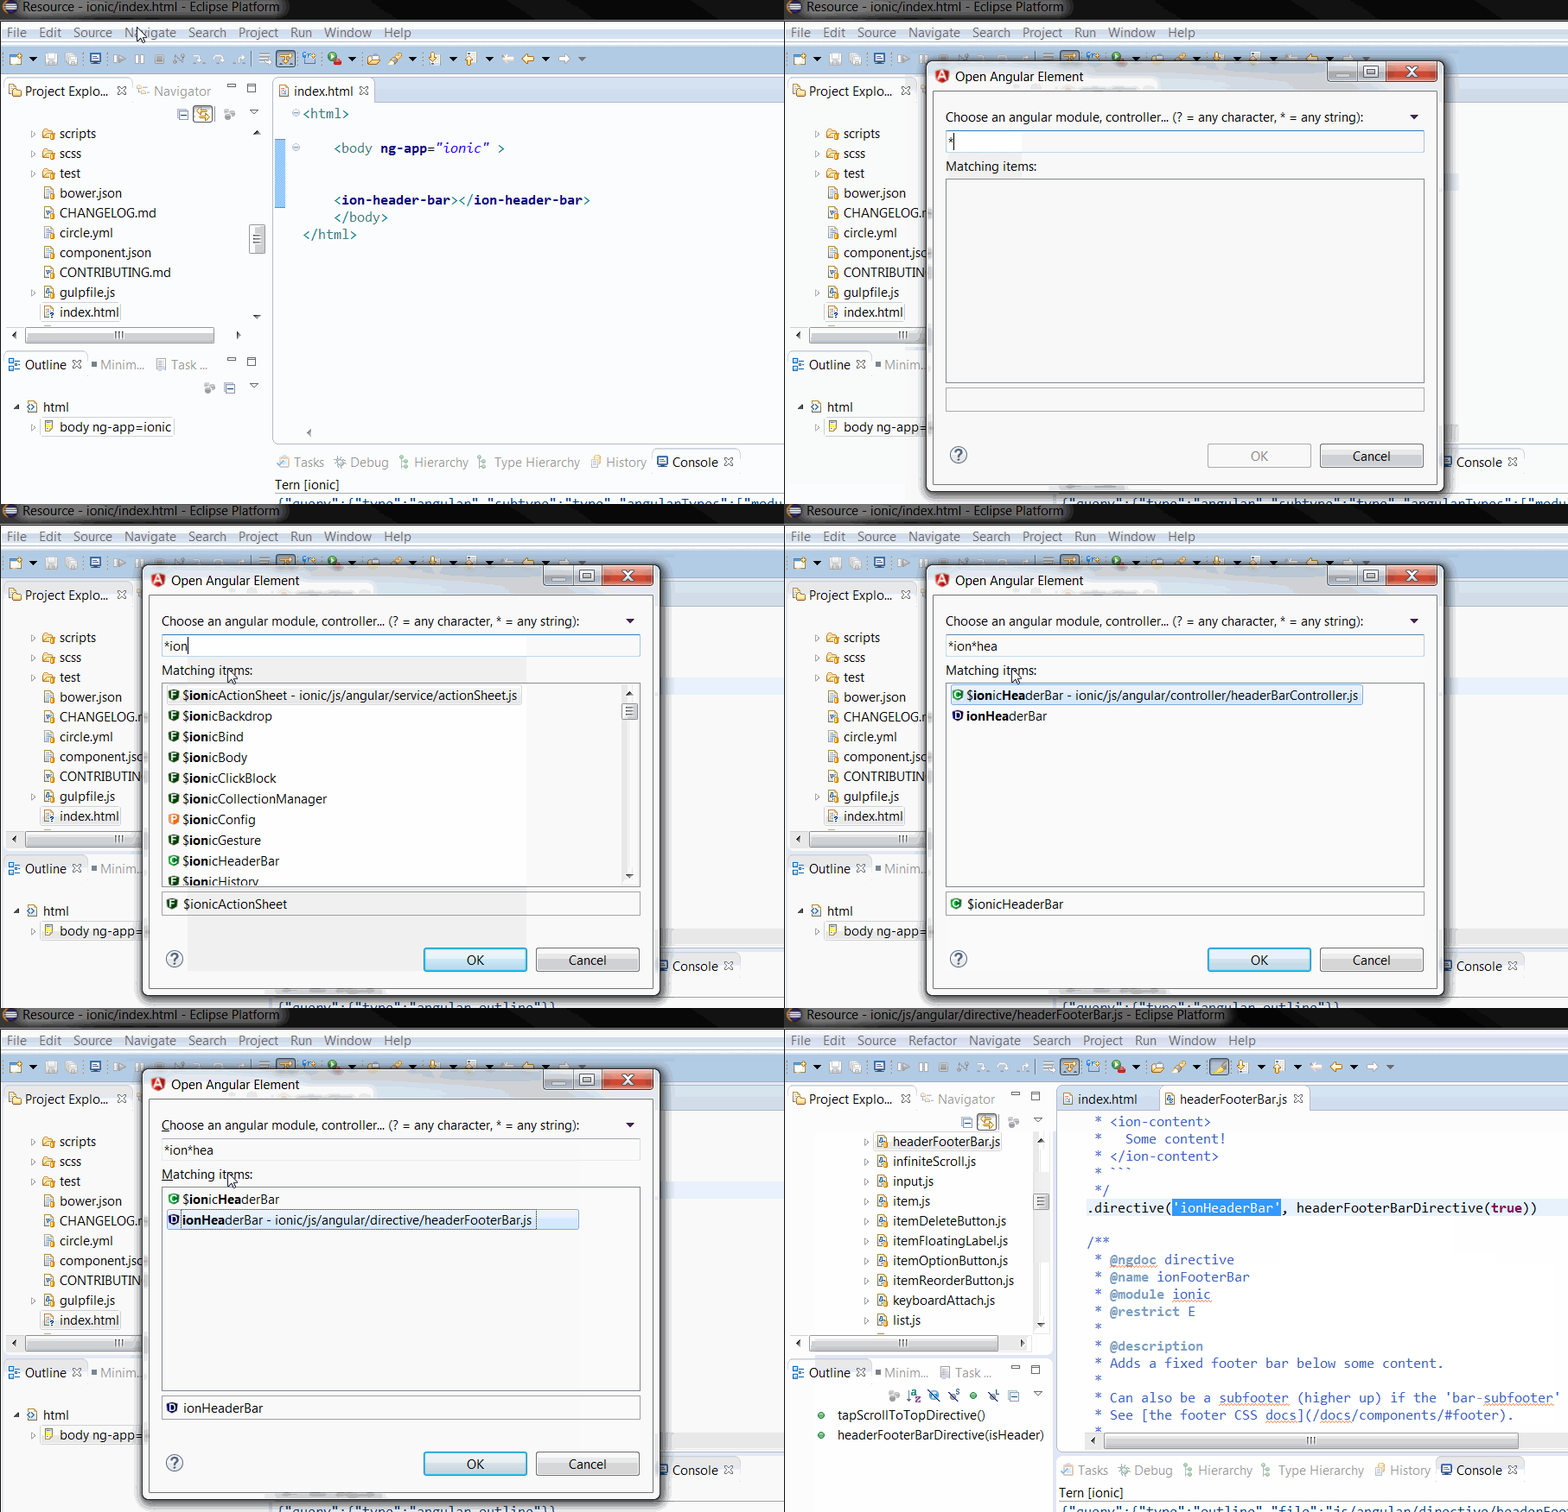
Open Angular Element
Please read Open Angular Element for more information.


2016년 2월 4일 목요일

angular js api

https://docs.angularjs.org/api

The documentation is organized into modules which contain various components of an AngularJS application. These components are directives, services, filters, providers, templates, global APIs, and testing mocks.

Angular Prefixes $ and $: To prevent accidental name collisions with your code, Angular prefixes names of public objects with $ and names of private objects with $. Please do not use the $ or $prefix in your code.

Angular Modules

This module is provided by default and contains the core components of AngularJS.
Directives
This is the core collection of directives you would use in your template code to build an AngularJS application.
Some examples include: ngClickngIncludengRepeat, etc… 
Services / Factories
This is the core collection of services which are used within the DI of your application.
Some examples include: $compile$http$location, etc…
Filters
The core filters available in the ng module are used to transform template data before it is rendered within directives and expressions.
Some examples include: filterdatecurrencylowercaseuppercase, etc...
Global APIs
The core global API functions are attached to the angular object. These core functions are useful for low level JavaScript operations within your application.
Some examples include: angular.copy()angular.equals()angular.element(), etc...
Use ngRoute to enable URL routing to your application. The ngRoute module supports URL management via both hashbang and HTML5 pushState.
Include the angular-route.js file and set ngRoute as a dependency for this to work in your application.
Services / FactoriesThe following services are used for route management:
  • $routeParams is used to access the querystring values present in the URL.
  • $route is used to access the details of the route that is currently being accessed.
  • $routeProvider is used to register routes for the application.
DirectivesThe ngView directive will display the template of the current route within the page.
Use ngAnimate to enable animation features within your application. Various core ng directives will provide animation hooks into your application when ngAnimate is included. Animations are defined by using CSS transitions/animations or JavaScript callbacks.
Include the angular-animate.js file and set ngAnimate as a dependency for this to work in your application.
Services / FactoriesUse $animate to trigger animation operations within your directive code.
CSS-based animationsFollow ngAnimate’s CSS naming structure to reference CSS transitions / keyframe animations in AngularJS. Once defined, the animation can be triggered by referencing the CSS class within the HTML template code.
JS-based animationsUse module.animation() to register a JavaScript animation. Once registered, the animation can be triggered by referencing the CSS class within the HTML template code.
Use ngAria to inject common accessibility attributes into directives and improve the experience for users with disabilities.
Include the angular-aria.js file and set ngAria as a dependency for this to work in your application.
Services
The $aria service contains helper methods for applying ARIA attributes to HTML.
$ariaProvider is used for configuring ARIA attributes.
Use the ngResource module when querying and posting data to a REST API.
Include the angular-resource.js file and set ngResource as a dependency for this to work in your application.
Services / FactoriesThe $resource service is used to define RESTful objects which communicate with a REST API.
Use the ngCookies module to handle cookie management within your application.
Include the angular-cookies.js file and set ngCookies as a dependency for this to work in your application.
Services / FactoriesThe following services are used for cookie management:
  • The $cookie service is a convenient wrapper to store simple data within browser cookies.
  • $cookieStore is used to store more complex data using serialization.
Use ngTouch when developing for mobile browsers/devices.
Include the angular-touch.js file and set ngTouch as a dependency for this to work in your application.
Services / FactoriesThe $swipe service is used to register and manage mobile DOM events.
DirectivesVarious directives are available in ngTouch to emulate mobile DOM events.
Use ngSanitize to securely parse and manipulate HTML data in your application.
Include the angular-sanitize.js file and set ngSanitize as a dependency for this to work in your application.
Services / FactoriesThe $sanitize service is used to clean up dangerous HTML code in a quick and convenient way.
FiltersThe linky filter is used to turn URLs into HTML links within the provided string.
Use ngMock to inject and mock modules, factories, services and providers within your unit tests.
Include the angular-mocks.js file into your test runner for this to work.
Services / Factories
ngMock will extend the behavior of various core services to become testing aware and manageable in a synchronous manner.
Some examples include: $timeout$interval$log$httpBackend, etc...
Global APIs
Various helper functions are available to inject and mock modules within unit test code.
Some examples inject()module()dump(), etc...

angular.module

  1. - function in module ng

The angular.module is a global place for creating, registering and retrieving Angular modules. All modules (angular core or 3rd party) that should be available to an application must be registered using this mechanism.
Passing one argument retrieves an existing angular.Module, whereas passing more than one argument creates a new angular.Module

Module

A module is a collection of services, directives, controllers, filters, and configuration information.angular.module is used to configure the $injector.
// Create a new module
var myModule = angular.module('myModule', []);

// register a new service
myModule.value('appName', 'MyCoolApp');

// configure existing services inside initialization blocks.
myModule.config(['$locationProvider', function($locationProvider) {
  // Configure existing providers
  $locationProvider.hashPrefix('!');
}]);
Then you can create an injector and load your modules like this:
var injector = angular.injector(['ng', 'myModule'])
However it's more likely that you'll just use ngApp or angular.bootstrap to simplify this process for you.

Usage

angular.module(name, [requires], [configFn]);

Arguments

ParamTypeDetails
namestring
The name of the module to create or retrieve.
requires
(optional)
!Array.<string>=
If specified then new module is being created. If unspecified then the module is being retrieved for further configuration.
configFn
(optional)
Function=
Optional configuration function for the module. Same as Module#config().

Returns

angular.Module

new module with the angular.Module api.

angular.injector

  1. - function in module ng
Creates an injector object that can be used for retrieving services as well as for dependency injection (see dependency injection).

Usage

angular.injector(modules, [strictDi]);

Arguments


ParamTypeDetails
modulesArray.<string|Function>
A list of module functions or their aliases. See angular.module. Theng module must be explicitly added.
strictDi
(optional)
boolean
Whether the injector should be in strict mode, which disallows argument name annotation inference.
(default: false)

Returns

injector
Injector object. See $injector.

Example

Typical usage
// create an injector
var $injector = angular.injector(['ng']);

// use the injector to kick off your application
// use the type inference to auto inject arguments, or use implicit injection
$injector.invoke(function($rootScope, $compile, $document) {
  $compile($document)($rootScope);
  $rootScope.$digest();
});


Sometimes you want to get access to the injector of a currently running Angular app from outside Angular. Perhaps, you want to inject and compile some markup after the application has been bootstrapped. You can do this using the extra injector() added to JQuery/jqLite elements. See angular.element.

This is fairly rare but could be the case if a third party library is injecting the markup.

In the following example a new block of HTML containing a ng-controller directive is added to the end of the document body by JQuery. We then compile and link it into the current AngularJS scope.

var $div = $('<div ng-controller="MyCtrl">{{content.label}}</div>');
$(document.body).append($div);

angular.element(document).injector().invoke(function($compile) {
  var scope = angular.element($div).scope();
  $compile($div)(scope);
});


ngController

  1. - directive in module ng
The ngController directive attaches a controller class to the view. This is a key aspect of how angular supports the principles behind the Model-View-Controller design pattern.
MVC components in angular:
  • Model — Models are the properties of a scope; scopes are attached to the DOM where scope properties are accessed through bindings.
  • View — The template (HTML with data bindings) that is rendered into the View.
  • Controller — The ngController directive specifies a Controller class; the class contains business logic behind the application to decorate the scope with functions and values
Note that you can also attach controllers to the DOM by declaring it in a route definition via the $routeservice. A common mistake is to declare the controller again using ng-controller in the template itself. This will cause the controller to be attached and executed twice.

Directive Info

  • This directive creates new scope.
  • This directive executes at priority level 500.

Usage

  • as attribute:
    <ANY
      ng-controller="expression">
    ...
    </ANY>

Arguments

ParamTypeDetails
ngControllerexpression
Name of a constructor function registered with the current $controllerProvideror an expression that on the current scope evaluates to a constructor function.
The controller instance can be published into a scope property by specifyingng-controller="as propertyName".
If the current $controllerProvider is configured to use globals (via$controllerProvider.allowGlobals()), this may also be the name of a globally accessible constructor function (not recommended).

Example

Here is a simple form for editing user contact information. Adding, removing, clearing, and greeting are methods declared on the controller (see source tab). These methods can easily be called from the angular markup. Any changes to the data are automatically reflected in the View without the need for a manual update.

Two different declaration styles are included below:
one binds methods and properties directly onto the controller using this:ng-controller="SettingsController1 as settings"
one injects $scope into the controller: ng-controller="SettingsController2"

The second option is more common in the Angular community, and is generally used in boilerplates and in this guide. However, there are advantages to binding properties directly to the controller and avoiding scope.
Using controller as makes it obvious which controller you are accessing in the template when multiple controllers apply to an element.
If you are writing your controllers as classes you have easier access to the properties and methods, which will appear on the scope, from inside the controller code.
Since there is always a . in the bindings, you don't have to worry about prototypal inheritance masking primitives.

This example demonstrates the controller as syntax.
  Edit in Plunker
<div id="ctrl-as-exmpl" ng-controller="SettingsController1 as settings">
  <label>Name: <input type="text" ng-model="settings.name"/></label>
  <button ng-click="settings.greet()">greet</button><br/>
  Contact:
  <ul>
    <li ng-repeat="contact in settings.contacts">
      <select ng-model="contact.type" aria-label="Contact method" id="select_{{$index}}">
         <option>phone</option>
         <option>email</option>
      </select>
      <input type="text" ng-model="contact.value" aria-labelledby="select_{{$index}}" />
      <button ng-click="settings.clearContact(contact)">clear</button>
      <button ng-click="settings.removeContact(contact)" aria-label="Remove">X</button>
    </li>
    <li><button ng-click="settings.addContact()">add</button></li>
 </ul>
</div>
This example demonstrates the "attach to $scope" style of controller.
  Edit in Plunker
<div id="ctrl-exmpl" ng-controller="SettingsController2">
  <label>Name: <input type="text" ng-model="name"/></label>
  <button ng-click="greet()">greet</button><br/>
  Contact:
  <ul>
    <li ng-repeat="contact in contacts">
      <select ng-model="contact.type" id="select_{{$index}}">
         <option>phone</option>
         <option>email</option>
      </select>
      <input type="text" ng-model="contact.value" aria-labelledby="select_{{$index}}" />
      <button ng-click="clearContact(contact)">clear</button>
      <button ng-click="removeContact(contact)">X</button>
    </li>
    <li>[ <button ng-click="addContact()">add</button> ]</li>
 </ul>
</div>